How to Track Time with Fibery
So where have all these hours gone?

In this article we’ll share ways to:
- ⏱ Track time manually and with a timer.
- 👆 Roll up the time spent on Tasks to Projects, Customers, and even Goals.
- 🧮 Generate a timesheet for a person or a whole team.
- 🤹 Report on any custom attribute, juggle data till we’re bored.
Fibery is a no-code platform, so there is no certified® way of doing something, including tracking time. Feel free to share your approach with fellow Creators in the Community.
Here are a couple of solutions we suggest:
- a lightweight — with manual or automated time logging
- a more powerful one — with a dedicated Database for time logs
- a bonus one suggested by our Solution Architect — similar to the previous one, but with different rules
Lightweight Time Tracker
Log time
To capture the time spent, we add a Field to the smallest thing we do. So it’s Task, not Project; Story, not Epic:
Teammates log the time spent manually:
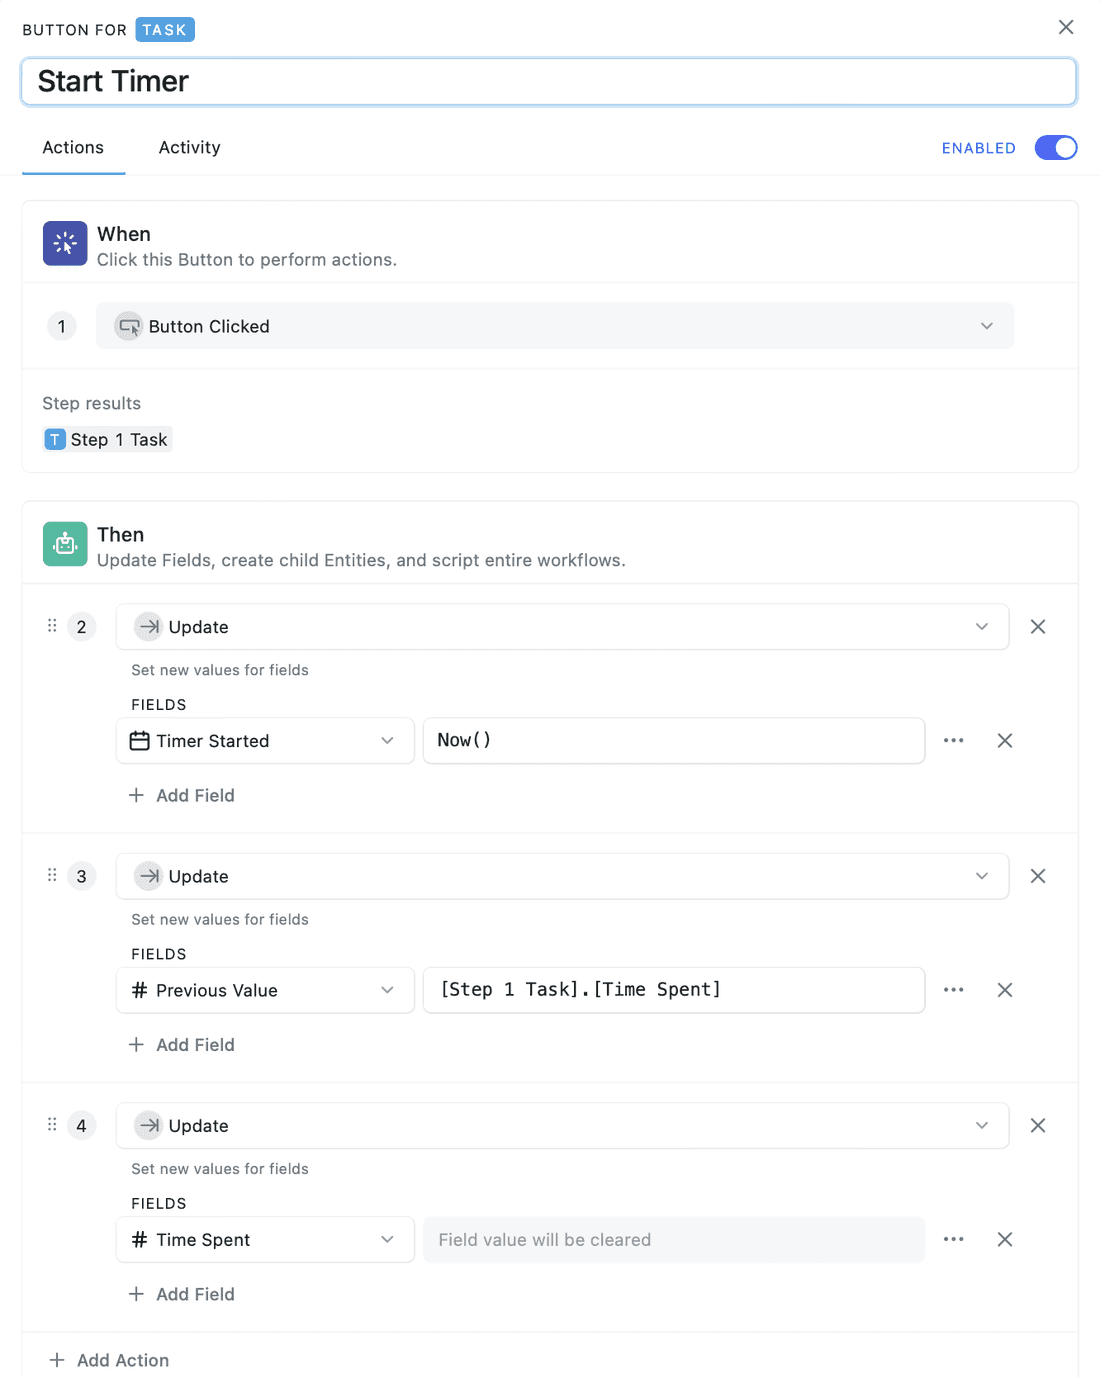
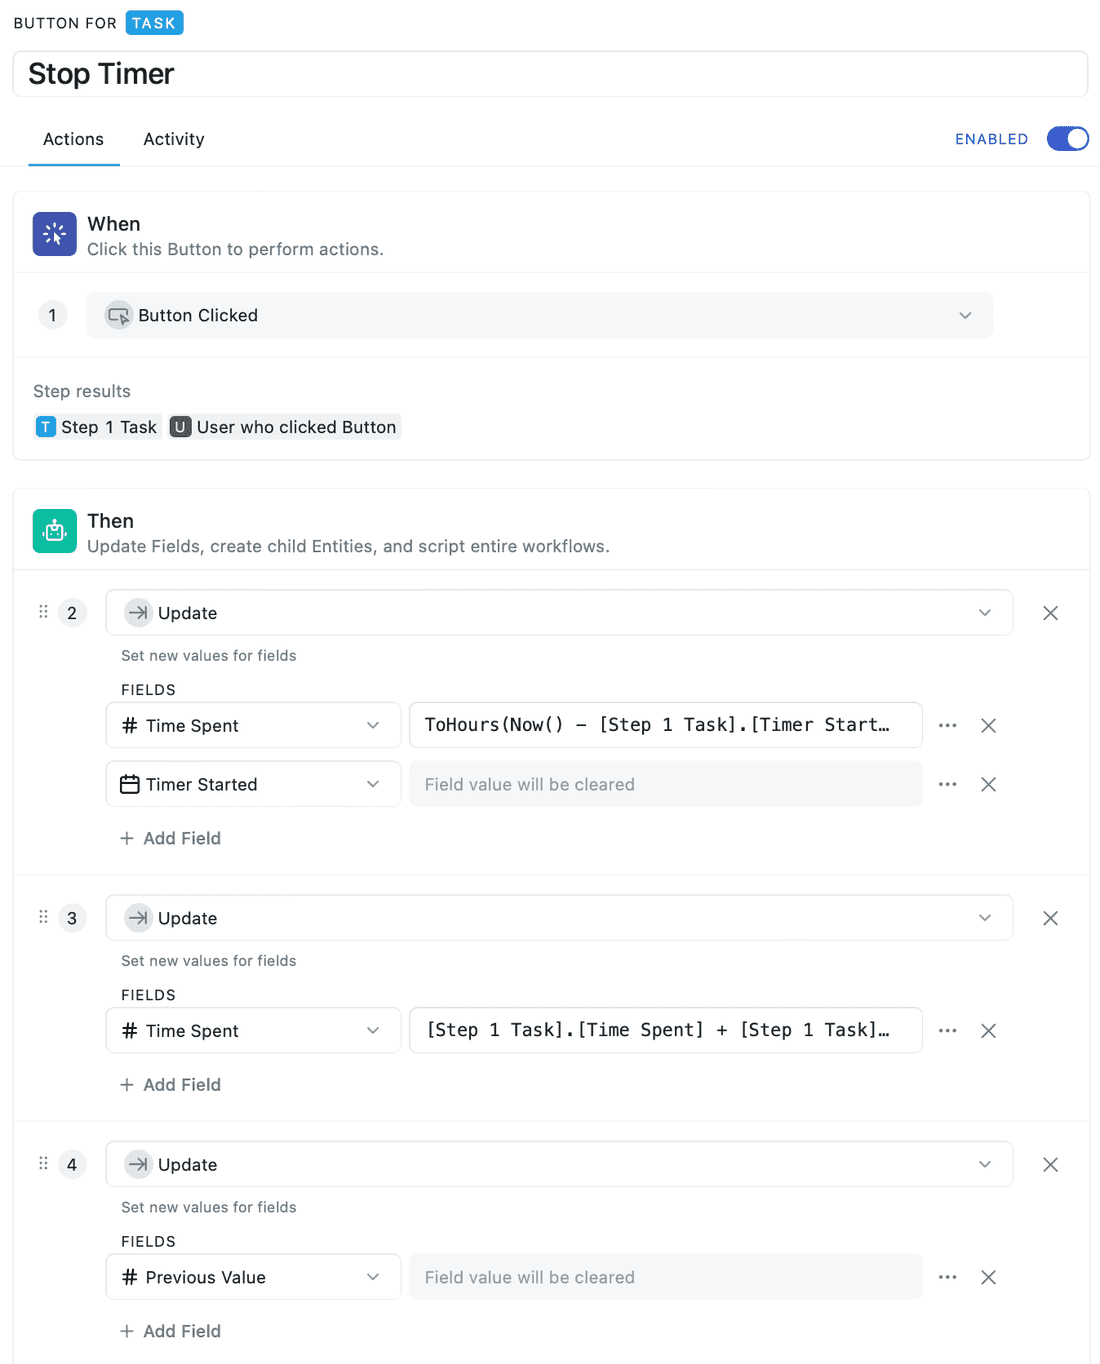
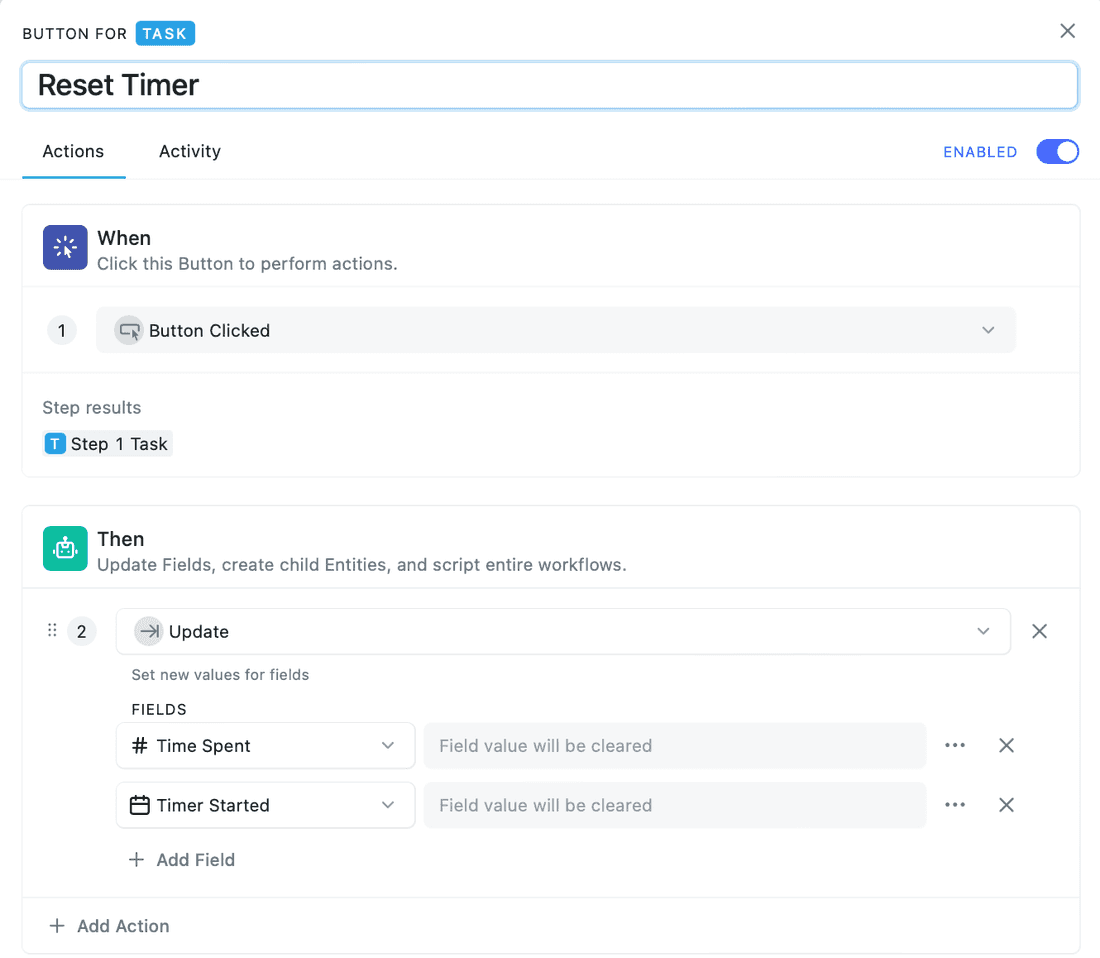
Or with a timer (involves creating extra Date Field, Previous Date Field and some Action Buttons):
Here are the rules that can be used for the Action Buttons:
- Start Timer

- Stop Timer

2. ToHours(Now() - [Step 1 Task].[Timer Started])
3. [Step 1 Task].[Time Spent] + [Step 1 Task].[Previous Value]- Reset Timer

To quickly spot the longest tasks, we display the time spent on each card on the Kanban board and turn on the sorting:
Roll up
To get a sense of how big a Project is, we roll up the time spent with a formula:
Tasks.Sum([Time Spent])Generate timesheets
Once we’ve collected the time entries, we are ready to report time spent by project and person:
Once the timsheets are ready, we generate a link for the HR department and stakeholders that avoid Fibery at any cost:
That’s it for the quick-and-easy solution.
🎁 Copy Lightweight Time Tracker to your workspace.
Time Tracker Pro
A more advanced solution comes in handy when you’d like to:
- keep detailed logs,
- tag time spent — ex. whether it’s billable,
- separately track time for each person working on a task.
Log time (like a pro)
Instead of adding a Field, this time we add a whole new Database — Time Log. We also connect it to the lowest level of work hierarchy — Task in our example — and User:
To simplify time entry, we configure a personal timesheet for everyone:
Timer is also an option here: those buttons from above could be re-programmed to add time logs. We are just too lazy to do it for this article — please ping us via Intercom if timer is what you need.
Tag logged time
Since Time Log is its own thing now, we are free to add attributes:
- billable or not,
- kind: email, meeting, or actual work,
- description.
Let’s add the Billable checkbox as an example:
We link the Time Entry to a specific Task, and the Task belongs to a certain Project. This means we can show the parent Project on a Time Entry too:
Roll up time (like a pro)
Since a Task has multiple Time Entries, the roll up for a pro starts one level lower:
-
Task.[Time Spent]=[Time Logs].Sum(Hours) -
Project.[Time Spent]=Tasks.Sum([Time Spent]) - …(till the very top)
Generate timesheets (like a pro)
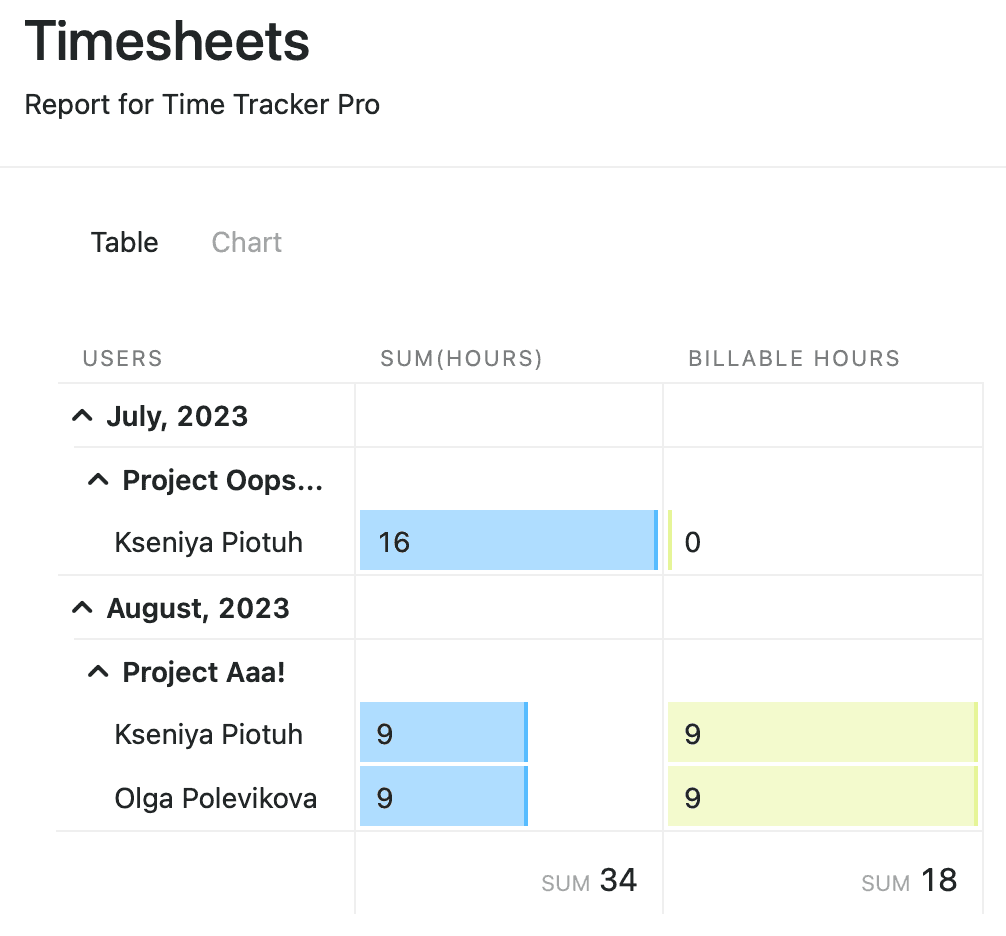
Now that we’ve collected quality data, it’s time to do some analysis. Where have we put most of our efforts in?
The same data from a different angle (just showing off):
So that’s the more advanced solution.
🎁 Copy Time Tracker Pro to your workspace.
Bonus Solution
🎁 Copy Space.
Here, to track time, we use another principle: instead of personal tables with time logs and automation buttons, we set rules on a User level (which will require being an Admin 👑) to track which tasks a User is working on.
Make the setup
The Time Tracker Space will consist of the following Databases: Project, Task, and Time Log.
Project has many Tasks, and Tasks have Time Logs associated with them.
🔗 Additional relations:
- Task has a relation to User. We can call this relation field ‘Currently working on’ to give us an idea of what task the user will be working on;
- Time Log has a relation to User — a standard one.
You can also add a couple of formulas to calculate how much time you spent on Tasks and on the Project in general. Don’t forget about other fields as Start and End Time for the Time Log. Here’s what it will look like:
Time Log Duration Formula: ToMinutes([End Time] - [Start Time])
Task Time Worked Formula: [Time Logs].Sum(Duration)
Project Total Worked Formula: Tasks.Sum([Time Worked])
Add Rules for a User
To build the tracker, we need two rules in Users Space. To do that you’ll need Admin privileges 👑 These two rules make the tracker start and stop counting time on a particular Task. Here’s how it’s done.
🏃♀️ Start Tracker
The purpose of this rule is to recognize when a user is currently working on something. This rule will also stop any other Time Log started before:
🏁 Stop Tracker
This rule applies to the case when a user is no longer working on a Task, so it will just stop the Tracker set for a Task:
🤷♀️ How all of this is supposed to work?
We created a special relation field to a User that is related to every Task, which is called ‘Currently working on’. When we connect any User to a Task, it will automatically start the Tracker. To stop the Tracker, you’ll need to unlink a User (or a Task).
Track your time
Let’s see the Tracker in practice 💪
There are some examples of adding a Time Log:
- Option 1. Open a Task → Link a User to ‘Currently working on’ → To stop the Tracker, unlink the User
- Option 2. Go to Users → Link a Task to ‘Currently working on’ → To stop the Tracker, unlink the Task. It will also get to the Time Log Database
Now you’ve got the proof you needed!

You can copy the template, but make sure to get back to ‘Add Rules for a User’ section of the guide and set up the Rules for the Users in your Workspace to enjoy this time logging solution.
🤗
If you haven’t tried Fibery yet, grab a free account.
Feel free to share how you do time tracking in our Community — doesn’t matter which tool you use. It’s also the best place to ask questions about the time trackers we’ve described here.
Let us know which how-tos you’d like to see next.
Psst... Wanna try Fibery? 👀
Infinitely flexible product discovery & development platform.